Showing posts with label Blogging Tips. Show all posts

Sunday, 16 June 2013

How to Show or Hide a Blogger Blog on Your Profile

Leave a Comment
How to Show or Hide a Blogger Blog on Your Profile
It's common for people who use Blogger to have more than one blog at Blogger. It's also common for one person to manage or monitor several blogs. A great way to get traffic from one blog to other blogs within Blogger is to list on a profile one or more other blogs. The administrator can determine which blogs will show on a profile. To show or hide a Blogger blog on your profile, follow the steps.
  1. First you need to log in to Blogger.

  2. On the "Blogger Dashboard" click on the "Edit Profile" link.

  3. On the new page, scroll down to "Show My Blogs."

  4. Here you will see a list of all of your blogs.

  5. If you want a blog to show on your profile click in the box next to the title of the blog.

  6. Once you do, there should be a check mark in the box.

  7. If you want to hide a blog from your profile, leave the box next to that blog empty.

  8. When you've selected the blogs you want to show, click "Save Settings".
You can change what Blogger blogs show on your profile any time you want.
Adding Blogger blogs to your profile is the same as recommending them. You can also add other people's blogs to your list. You and your friends could exchange links: you add a link to their blog and they add a link to your blog on their profile.
If you don't click on "Save Settings," your profile will remain the same as it was before.

Read More...

Saturday, 15 June 2013

How to Earn More Page Views With Blogger Blogs

Leave a Comment
How to Earn More Page Views With Blogger Blogs
Finding ways to gaining exposure on your blogger blog is part of the fun of blogging. There are things you can do to help you get more visitors and even subscribers. Once you have a big following, you can even earn money by blogging.
  1. Update your blog regularly. If you want people to come, give them interesting content to read. This content will help you get indexed in search engines on relevant topics and bring visitors your way.

  2. Publicize your blog by telling people about it. Add your blog URL to your email autosignature line and to signature lines in message forums. This can entice visitors.

  3. Comment on other people's blogs with a link back to your own. People will often return the favor and if they find something interesting on your blog, they may bookmark you and visit again.

  4. Syndicate your blog by joining an RSS (Really Simple Syndication) feeder service such as the one at Feedburner which can help you bring more traffic in by syndicating your blog to many news sources and give people an option to subscribe to receive future entries in their email inbox.

  5. Install a fun and interesting template. Templates that are unique on blogger blogs can grab someone's attention and get them to view more than just your landing page. There are many free templates online that you can download to make your blogger blog unique.

  6. Ping your blog. A ping service such as Pingomatic is a Web site that you simply put your blog information into each time there's a new blog entry written. It notifies multiple directory services that you have something new to share.

  7. Join Technorati and utilize tools there including tagging services that help you categorize your blog to bring it more exposure and to advertise your blog in directories. Technorati has a lot of useful tools for bloggers.

  8. Submit your blogger blog to the search engines for indexing. For Google, use the link in the Resources section. This will help your blogger blog gain more page views when people search on a subject that Google has indexed. This is especially helpful if you write about a niche topic.

  9. Join social bookmarking Web sites and list their widgets on your blog. Bloggers can bookmark their own posts on sites like Digg and Del.icio.us in order to gain more page views. Other people who bookmark your site might bookmark you with widgets and additions to your blog template which can bring new visitors in as well.
Read More...

Friday, 14 June 2013

How to Ping a Blog in Google

Leave a Comment
How to Ping a Blog in Google
Google, like many search engines, gives you the ability to submit a "ping" when you update your blog. Pinging Google notifies the search engine's Web crawling robots that your website has been updated and that you would like the new content to be added to Google's database as quickly as possible. When you add new content to your blog you may be able to get the content listed faster by utilizing Google's blog ping service.
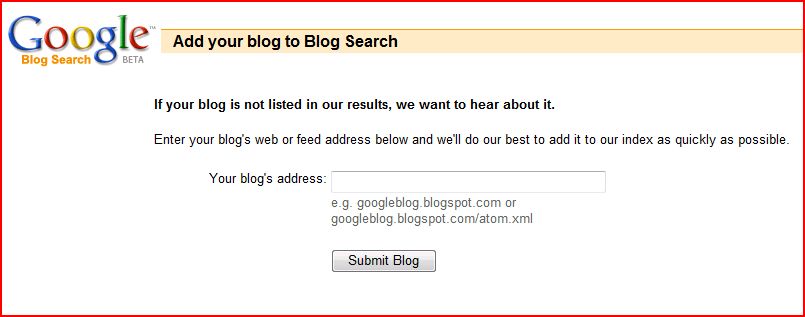
  1. Navigate in your Web browser to the Google blog search ping service at blogsearch.google.com.

  2. Click the text field next to "Your blog's address," and type the address to your blog, such as "example.com." If your blog has an RSS feed you may also type the address to the feed, such as "example.com/rss."

  3. Click the "Submit Blog" button. The page changes to display the message "Thanks for sharing your blog."
Many blog management systems such as WordPress have the ability to ping Google automatically each time you publish a new post. Consult the help files for the blog management software installed on your Web server to see if the software supports this feature.

Read More...

Wednesday, 12 June 2013

How to Get Your Blog Seen

Leave a Comment
How to Get Your Blog Seen
After creating a blog, it can be frustrating to create new posts every day when your blog doesn't appear to have many visitors. You can increase your readership by submitting your blog to search engines, commenting on other blogs, submitting your blog to human-edited directories, using SEO add-ons for your blogging platform, and by engaging people on Facebook and Twitter. These methods won't drive millions of people to your website overnight, but they will increase your blog's audience over time.
  1. Submit your blog URL to major search engines like Google, Yahoo! and Bing, so your website gains maximum exposure. After your website is indexed by a search engine, it begins to show up in each search engine's results after a search is performed.

  2. Comment on other people's blogs that are thematically similar to your blog. Don't try to use the comment section as a way to advertise your blog. Instead, say something interesting about the topic and try to build friendships with people who also comment on the blog. Post your blog's URL as part of your signature when leaving a comment so that people who are interested in what you have to say will visit your blog.

  3. Create a sitemap for your entire website and submit it to Google, Bing and Yahoo! A sitemap is a list of pages that are available for visitors to surf, and search engines to crawl, on your website.

  4. Submit your website to a human-edited directories like the Open Directory Project or the Yahoo! Directory. Human-edited directories are more highly valued by search engines than link farms that accept any submitted link.

  5. Use social media to promote your blog. Use Facebook and Twitter to look for people to follow while gaining new followers for your blog. Create a status update or a tweet for every blog post you generate to let your followers know that you have new content on your blog.

  6. Use add-ons or extensions to get the most from your blogging platform. If you use WordPress, Joomla, Drupal or any other blogging platform, you can install extensions to help you promote your blog through SEO, automatic pinging, social media integration and more.

Read More...

Monday, 10 June 2013

How to Download All Blog Posts From Blogger

Leave a Comment
How to Download All Blog Posts From Blogger
Whether you blog for business or pleasure, you will need to back up your posts occasionally. Backing up your posts ensures that your hard work will never go to waste due to technical errors. Blogspot features an easy blog export tool that allows you to download all of your blog posts in a matter of seconds. This feature is free and easy to use, so you can download your posts on a regular basis to ensure you never lose your hard work.
  1. Open your blog dashboard and locate the blog you wish to back up.

  2. Select the “Settings” option from the dashboard menu to open the “Others” settings menu.

  3. Click “Export blog” link, which is located at the top of the pages beside the “Blog Tools” sub-header.

  4. Click the “Download Blog” button. Choose to save the file and select a destination path from the directory that pops up. Click “OK” to begin the download process. Once the download is complete, you will have an XML file in your save destination that contains each post from your blog. The file retains any HTML markings that were on the posts, so you can easily copy and paste your posts into a new blog if you ever lose your original entries.

Read More...

Sunday, 9 June 2013

How to Post Links in Blogger Comments

Leave a Comment
How to Post Links in Blogger Comments
If you have a pertinent piece of information to include in your comment on a Blogger blog, but don't have room to write it in the comment itself, you can include a hyperlink. Placing links in Blogger comments lets you comment on the blog post itself and at the same time link to relevant content that other readers can click on only if they choose to, without filling your comment with potentially unnecessary material. However, bear in mind that some blog masters view hyperlinks as spam, so be sure to include relevant text with the hyperlink so as to not look like a spammer.
  1. Log in to Blogger.com with the username under which you intend to post a comment. In some cases, the blog may not require readers to sign in to leave comments.

  2. Navigate to the desired blog post. Find the "Post Comment" box at the bottom of the blog post.

  3. Paste the following text into the comment box:

  4. <a href="http://www.yourlinkhere.com">Your Text Here</a>.

    Delete the existing URL and replace it with your own. Delete the "Your Text Here" link text and replace it with the words you want to use to describe your link. These words will appear as clickable link text in the comment.

  5. Add any other text before or after this code. Click "Post Comment" when finished to submit your link.
Some bloggers will keep comments in moderation until approved. Note that your comment will not appear immediately if this is the case.

Read More...

Friday, 7 June 2013

How to Make a Number Page Navigation Bar for Bloggers

Leave a Comment
How to Make a Number Page Navigation Bar for Bloggers
If you run a blog on the Blogger platform, then by default, you do not have a numbered page navigation bar along the bottom of your blog. While some themes include this, if you do not have a numbered page navigation bar and want to use one on your blog, you can insert the code manually. Unfortunately, the code will only work with certain themes, so it is not a guaranteed method. If you have already customized your template, ensure you back it up before proceeding.

Big thanks for Abu Farhan and Mohamed Rias for the script.
  1. Log into "Blogger Dashboard," then "Template" and then "Edit HTML." (No need to expand widgets template)

  2. Locate the following code: ]]></b:skin>

  3. Add the following code before it:

  4. .showpageArea a {border: 1px solid #505050;
    color: #000000;font-weight:normal;
    padding: 3px 6px !important;
    padding: 1px 4px ;margin:0px 4px;
    text-decoration: none;
    }
    .showpageArea a:hover {
    font-size:11px;
    border: 1px solid #333;
    color: #000000;
    background-color: #FFFFFF;
    }
    
    .showpageNum a {border: 1px solid #505050;
    color: #000000;font-weight:normal;
    padding: 3px 6px !important;
    padding: 1px 4px ;margin:0px 4px;
    text-decoration: none;
    
    }
    .showpageNum a:hover {
    font-size:11px;
    border: 1px solid #333;
    color: #000000;
    background-color: #FFFFFF;
    
    }
    .showpagePoint {font-size:11px;
    padding: 2px 4px 2px 4px;
    margin: 2px;
    font-weight: bold;
    border: 1px solid #333;
    color: #fff;
    background-color: #000000;
    
    
    }
    
    .showpage a:hover {font-size:11px;
    border: 1px solid #333;
    color: #000000;
    background-color: #FFFFFF;
    
    }
    .showpageNum a:link,.showpage a:link {
    font-size:11px;
    padding: 2px 4px 2px 4px;
    margin: 2px;
    text-decoration: none;
    border: 1px solid #0066cc;
    color: #0066cc;
    background-color: #FFFFFF;}
    
    .showpageNum a:hover {font-size:11px;
    border: 1px solid #333;
    color: #000000;
    background-color: #FFFFFF;
    }

  5. Find this code:

  6. <b:section class='main' id='main' showaddelement='yes' >
    <b:widget id='Blog1' locked='true' title='Blog Posts' type='Blog'/>
    </b:section>

  7. Add the following code after that code:

  8. <script type='text/javascript'>
    
    var home_page_url = location.href; 
    
    
    var pageCount=10;
    var displayPageNum=6;
    var upPageWord ='Previous';
    var downPageWord ='Next';
    
    
    function showpageCount(json) {
    var thisUrl = home_page_url;
    var htmlMap = new Array();
    var thisNum = 1;
    var postNum=1;
    var itemCount = 0;
    var fFlag = 0;
    var eFlag = 0;
    var html= &#39;&#39;;
    var upPageHtml =&#39;&#39;;
    var downPageHtml =&#39;&#39;;


    htmlMap[htmlMap.length]=&#39;/&#39;;
    postNum++;
    
    for(var i=pageCount-1, post; post = json.feed.entry[i]; i=i+pageCount) {
    
      
     var timestamp1 = post.published.$t.substring(0,19)+post.published.$t.substring(23,29);
     timestamp = encodeURIComponent(timestamp1);
     var title = post.title.$t;
       if(thisUrl.indexOf(timestamp)!=-1 ){
         thisNum = postNum;
       }
     
       postNum++;
       htmlMap[htmlMap.length] = &#39;/search?updated-max=&#39;+timestamp+&#39;&amp;max-results=&#39;+pageCount;
     
    }
    
    var banyaknomer = htmlMap.length;
    if (json.feed.entry.length % pageCount == 0){
     var banyaknomer = htmlMap.length -1 ;
     postNum=postNum-1;
    };
    
     
    for(var p =0;p&lt; banyaknomer;p++){
     if(p&gt;=(thisNum-displayPageNum-1) &amp;&amp; p&lt;(thisNum+displayPageNum)){
      if(fFlag ==0 &amp;&amp; p == thisNum-2){
       if(thisNum==2){
        upPageHtml = &#39;&lt;span class=&quot;showpage&quot;&gt;&lt;a href=&quot;/&quot;&gt;&#39;+ upPageWord +&#39;&lt;/a&gt;&lt;/span&gt;&#39;;
       }else{
        upPageHtml = &#39;&lt;span class=&quot;showpage&quot;&gt;&lt;a href=&quot;&#39;+htmlMap[p]+&#39;&quot;&gt;&#39;+ upPageWord +&#39;&lt;/a&gt;&lt;/span&gt;&#39;;
       }
     
       fFlag++;
      }
     
      if(p==(thisNum-1)){
       html += &#39;&lt;span class=&quot;showpagePoint&quot;&gt;&#39;+thisNum+&#39;&lt;/span&gt;&#39;;
      }else{
       if(p==0){
         html += &#39;&lt;span class=&quot;showpageNum&quot;&gt;&lt;a href=&quot;/&quot;&gt;1&lt;/a&gt;&lt;/span&gt;&#39;;
    
       }else{
        html += &#39;&lt;span class=&quot;showpageNum&quot;&gt;&lt;a href=&quot;&#39;+htmlMap[p]+&#39;&quot;&gt;&#39;+ (p+1) +&#39;&lt;/a&gt;&lt;/span&gt;&#39;;
       }
      }
     
      if(eFlag ==0 &amp;&amp; p == thisNum){
       downPageHtml = &#39;&lt;span class=&quot;showpage&quot;&gt; &lt;a href=&quot;&#39;+htmlMap[p]+&#39;&quot;&gt;&#39;+ downPageWord +&#39;&lt;/a&gt;&lt;/span&gt;&#39;;
       eFlag++;
      }
     }
    }
     
    if(thisNum&gt;1){
     html = &#39;&#39;+upPageHtml+&#39; &#39;+html +&#39; &#39;;
    }
     
    html = &#39;&lt;div class=&quot;showpageArea&quot;&gt;&lt;span style=&quot;COLOR: #000;&quot; class=&quot;showpageOf&quot;&gt; Pages (&#39;+(postNum-1)+&#39;)&lt;/span&gt;&#39;+html;
     
    if(thisNum&lt;(postNum-1)){
     html += downPageHtml; 
    }
     
    if(postNum==1) postNum++;
    html += &#39;&lt;/div&gt;&#39;;
     
    
    var pageArea = document.getElementsByName(&quot;pageArea&quot;);
    var blogPager = document.getElementById(&quot;blog-pager&quot;);
    
    if(postNum &lt;= 2){
     html =&#39;&#39;;
    }
    
    for(var p =0;p&lt; pageArea.length;p++){
     pageArea[p].innerHTML = html;
    }
    
    
    if(pageArea&amp;&amp;pageArea.length&gt;0){
     html =&#39;&#39;;
    }
    
    if(blogPager){
     blogPager.innerHTML = html;
    }
    
    
    }
    
    
    function showpageCount2(json) {
    
    var thisUrl = home_page_url;
    var htmlMap = new Array();
    var isLablePage = thisUrl.indexOf(&quot;/search/label/&quot;)!=-1;
    var thisLable = isLablePage ? thisUrl.substr(thisUrl.indexOf(&quot;/search/label/&quot;)+14,thisUrl.length) : &quot;&quot;;
    thisLable = thisLable.indexOf(&quot;?&quot;)!=-1 ? thisLable.substr(0,thisLable.indexOf(&quot;?&quot;)) : thisLable;
    var thisNum = 1;
    var postNum=1;
    var itemCount = 0;
    var fFlag = 0;
    var eFlag = 0;
    var html= &#39;&#39;;
    var upPageHtml =&#39;&#39;;
    var downPageHtml =&#39;&#39;;


    var labelHtml = &#39;&lt;span class=&quot;showpageNum&quot;&gt;&lt;a href=&quot;/search/label/&#39;+thisLable+&#39;?&amp;max-results=&#39;+pageCount+&#39;&quot;&gt;&#39;;
    var thisUrl = home_page_url; 
    
    htmlMap[htmlMap.length]=labelHtml;
    postNum++;
    
    for(var i=pageCount-1, post; post = json.feed.entry[i]; i=i+pageCount) {
     var timestamp1 = post.published.$t.substring(0,19)+post.published.$t.substring(23,29);
     timestamp = encodeURIComponent(timestamp1);
    
     
     var title = post.title.$t;
    
       if(thisUrl.indexOf(timestamp)!=-1 ){
        thisNum = postNum;
       }
     
       if(title!=&#39;&#39;) postNum++;
       htmlMap[htmlMap.length] = &#39;/search/label/&#39;+thisLable+&#39;?updated-max=&#39;+timestamp+&#39;&amp;max-results=&#39;+pageCount;
        
     itemCount++;
    }
    
    var banyaknomer = htmlMap.length;
    if (json.feed.entry.length % pageCount == 0){
     var banyaknomer = htmlMap.length -1 ;
     postNum=postNum-1;
    };
     
    for(var p =0;p&lt; banyaknomer;p++){
     if(p&gt;=(thisNum-displayPageNum-1) &amp;&amp; p&lt;(thisNum+displayPageNum)){
      if(fFlag ==0 &amp;&amp; p == thisNum-2){
       if(thisNum==2){
        upPageHtml = labelHtml + upPageWord +&#39;&lt;/a&gt;&lt;/span&gt;&#39;;
       }else{
        upPageHtml = &#39;&lt;span class=&quot;showpage&quot;&gt;&lt;a href=&quot;&#39;+htmlMap[p]+&#39;&quot;&gt;&#39;+ upPageWord +&#39;&lt;/a&gt;&lt;/span&gt;&#39;;
       }
     
       fFlag++;
      }
     
      if(p==(thisNum-1)){
       html += &#39;&lt;span class=&quot;showpagePoint&quot;&gt;&#39;+thisNum+&#39;&lt;/span&gt;&#39;;
      }else{
       if(p==0){
        html = labelHtml+&#39;1&lt;/a&gt;&lt;/span&gt;&#39;;
       }else{
        html += &#39;&lt;span class=&quot;showpageNum&quot;&gt;&lt;a href=&quot;&#39;+htmlMap[p]+&#39;&quot;&gt;&#39;+ (p+1) +&#39;&lt;/a&gt;&lt;/span&gt;&#39;;
       }
      }
     
      if(eFlag ==0 &amp;&amp; p == thisNum){
       downPageHtml = &#39;&lt;span class=&quot;showpage&quot;&gt; &lt;a href=&quot;&#39;+htmlMap[p]+&#39;&quot;&gt;&#39;+ downPageWord +&#39;&lt;/a&gt;&lt;/span&gt;&#39;;
       eFlag++;
      }
     }
    }
     
    if(thisNum&gt;1){
     if(!isLablePage){
      html = &#39;&#39;+upPageHtml+&#39; &#39;+html +&#39; &#39;;
     }else{
      html = &#39;&#39;+upPageHtml+&#39; &#39;+html +&#39; &#39;;
     }
    }
     
    html = &#39;&lt;div class=&quot;showpageArea&quot;&gt;&lt;span style=&quot;COLOR: #000;&quot; class=&quot;showpageOf&quot;&gt; Pages (&#39;+(postNum-1)+&#39;)&lt;/span&gt;&#39;+html;
     
    if(thisNum&lt;(postNum-1)){
     html += downPageHtml; 
    }
     
    if(postNum==1) postNum++;
    html += &#39;&lt;/div&gt;&#39;;
     
    var pageArea = document.getElementsByName(&quot;pageArea&quot;);
    var blogPager = document.getElementById(&quot;blog-pager&quot;);
    
    if(postNum &lt;= 2){
     html =&#39;&#39;;
    }
    
    for(var p =0;p&lt; pageArea.length;p++){
     pageArea[p].innerHTML = html;
    }
    
    if(pageArea&amp;&amp;pageArea.length&gt;0){
     html =&#39;&#39;;
    }
    
    if(blogPager){
     blogPager.innerHTML = html;
    }
    
    
    }
    
    
    </script>
    
    <script type='text/javascript'>
    
      var thisUrl = home_page_url;
     if (thisUrl.indexOf(&quot;/search/label/&quot;)!=-1){
      if (thisUrl.indexOf(&quot;?updated-max&quot;)!=-1){
       var lblname1 = thisUrl.substring(thisUrl.indexOf(&quot;/search/label/&quot;)+14,thisUrl.indexOf(&quot;?updated-max&quot;));
      }else{
       var lblname1 = thisUrl.substring(thisUrl.indexOf(&quot;/search/label/&quot;)+14,thisUrl.indexOf(&quot;?&amp;max&quot;));
      }
     }
    
     var home_page = &quot;/&quot;;
     if (thisUrl.indexOf(&quot;?q=&quot;)==-1 &amp;&amp; thisUrl.indexOf(&quot;.html&quot;)==-1){ 
      if (thisUrl.indexOf(&quot;/search/label/&quot;)==-1){   
       document.write('&lt;script src=&quot;'+home_page+'feeds/posts/summary?alt=json-in-script&amp;callback=showpageCount&amp;max-results=99999&quot; &gt;&lt;\/script&gt;')
      }else{document.write('&lt;script src=&quot;'+home_page+'feeds/posts/full/-/'+lblname1+'?alt=json-in-script&amp;callback=showpageCount2&amp;max-results=99999&quot; &gt;&lt;\/script&gt;')
      }
     }
    </script>

  9. Click "Save Template."
Read More...

Monday, 15 April 2013

How to Post Multiple Pictures in Blogger

Leave a Comment
How to Post Multiple Pictures in Blogger
If you have a lot of photos to add to your Blogger entries (posts), you have the option to use the Blogger tool that lets you select and insert more than one picture at a time. This built-in feature works with the accessible, digital images on your computer, Picasa Web album, URL address or with the images already stored on your blog account. Understand how to access this tool and post the multiple pictures you desire to your Blogger page.
  1. Log in to your Blogger account and click the "New Post" button next to the blog you want to post multiple pictures to.

  2. Click the "Compose" tab on the top, right corner of the text box that appears and then click the "Add Image" button that displays.

  3. Click the "Choose Files" button and then click the "Upload," "From this blog," "From Picasa Web Albums" or "From a URL" link on the left to select multiple images from your computer to post. Follow the prompts to choose files from your computer or enter the data needed to access your photos. Press and hold the "CTRL" button on your keyboard and then click the images you want to select them. Click the "Add selected" button when ready.

  4. Click on the image when it appears in your post and then click the menu items that automatically display to determine the size and alignment of your graphic. Repeat this process for your other pictures.

  5. Enter the desired information for your post and then click the "Publish Post" button.

Read More...

Sunday, 14 April 2013

How to Add a Picture on Blogger

Leave a Comment
How to Add a Picture on Blogger
Web surfers accustomed to seeing images everywhere on the Internet may consider your blog to be rather dull if it contains no pictures. Text-only pages were fine when the Internet was young, but many bloggers today include music, videos and photos on blog posts. As a Google Blogspot blogger, you have to ability to add flavor to your blog posts using pictures. Blogspot provides two ways to do this.
  1. Click the "New Post" button that appears in the Manage Blogs section. A Create Post page opens.

  2. Type a title in the "Title" text box, and then type a few words in the text editor that appears below the Title text box.

  3. Click the "Insert Image" icon that appears at the top of the text editor. A window opens that allows you to add a picture from your computer or add a link to an image on the Web.

  4. Click the "Browse" button to display a window containing your hard drive's files. Scroll through the files and find an image file you would like to add to your blog post. Double-click that file to select it.

  5. Click one of the layout choices in the "Choose a Layout" section. The choices are "Left," "Center" and "Right." Choosing one of these options positions your picture in the location you specified. Select "Left," for example, and the picture will appear on the left side of your blog post.

  6. Click "Small," "Medium" or "Large" to select one of the size options in the Image Size section. The default image size is medium.

  7. Click the "Terms of Service" check box to place a check mark there and then click "Upload Image." The site shows you a preview of the image. Click "Done" to add it to your post.

  8. Click "Publish Post," and then click "View Post" to see your post containing your new picture.
You can also type or paste the URL of an image located on the Web into the URL text box that appears in the Upload Images window. The site will add it to your blog post.
Add as many pictures as you like to a Blogspot post. Images that you add appear in your post at the location where your cursor lies when you click the "Insert Image" icon.
Read More...

How to Disable the Mouse Right Click on Blogger

Leave a Comment
How to Disable the Mouse Right Click on Blogger
If you're posting a piece of writing or a particular photograph onto your Blogspot blog, and you don't want people to copy it, you can use a Javascript code to prevent users from right-clicking. However, you should know that this will only prevent users who have Javascript turned on from right-clicking -- more advanced users will simply be able to bypass this protection. Unfortunately, besides the Javascript code, there isn't anyway to prevent someone from right-clicking.
  1. Go to Blogger.com and log in to your blog.

  2. Go to your "Blogger Dashboard," then click "Layout".

  3. Click "Add Gadget."

  4. Click "HTML/Javascript."

  5. Copy and paste the following code:

  6. <script language=JavaScript>
    <!--
    
    //Disable right mouse click Script
    //By Maximus (maximus@nsimail.com) w/ mods by DynamicDrive
    //For full source code, visit http://www.dynamicdrive.com
    
    var message="Function Disabled!";
    
    ///////////////////////////////////
    function clickIE4(){
    if (event.button==2){
    alert(message);
    return false;
    }
    }
    
    function clickNS4(e){
    if (document.layers||document.getElementById&&!document.all){
    if (e.which==2||e.which==3){
    alert(message);
    return false;
    }
    }
    }
    
    if (document.layers){
    document.captureEvents(Event.MOUSEDOWN);
    document.onmousedown=clickNS4;
    }
    else if (document.all&&!document.getElementById){
    document.onmousedown=clickIE4;
    }
    
    document.oncontextmenu=new Function("alert(message);return false")
    
    // -->
    </script>

  7. Click "Save." When you try and right click anywhere on your blog you will see a message that reads "Function Disabled."
You can change the words "Function Disabled" to anything you want by changing the words in the code.
Read More...

Saturday, 13 April 2013

How to Follow a Blog on Blogger

Leave a Comment
How to Follow a Blog on Blogger
Blogger offers a free blog publishing website where you can share your thoughts, memos, pictures, and links - basically a blog. The website has an option where you can follow your favorite blogs. Whenever the person makes a new post, it shows up on your dashboard when you are logged in. Read on to find out how!

WHAT KIND OF BLOGS CAN I FOLLOW?
You can follow any blog that has "feed". For example, you can follow Blogger blogs and Wordpress blogs. It's an excellent way to keep in touch with someone as well as find out when they make new blog posts! There are two ways you can follow someone"s blog.

FOLLOW VIA WIDGET
Sometimes, you will see a widget on someone's blog. Click on FOLLOW, make sure you are signed into your Blogger account. You can choose to publicly follow (meaning your little icon shows up on the widget) or you can follow privately (your little icon won't show up on the widget)

FOLLOW VIA DASHBOARD.
Like someone's blog but don't see the widget? Try this step. Before that, make sure you are signed in on your Blogger account.
  1. Under the "Reading List" and "Blogs I"m Following", you should see a "ADD" button.

  2. Click on that and type in the URL of the blog you would like updates on.

  3. Click "Next" and viola!

Read More...

Blogger Customization Tips

Leave a Comment

Blogger Customization Tips
Blogs are an easy way for individuals and companies to publish their thoughts, activities and products on the Internet. Blogger, a free blog publishing service owned by Google, allows you to create time stamped blogs with your own unique blog address. Bloggers are encouraged to fully customize their Blogger page to suit their personal style and preferences.

Templates
Templates are an ideal way to customize your Blogger page with little or no knowledge of coding. Templates are available from Blogger as well as many Internet sites -- most of which are free except for more intricate designs, which will require purchase. They feature a wide variety of themes, layouts, colors and purposes that you will be able to choose from to fit your needs. Template code is copied and pasted into Blogger, which will apply it to your site.

Add-ons
Blogger allows you to add on custom features and gadgets to your site that range from hit counters to third-party applications. Add-ons are a quick way to customize your blog by simply locating an add-on under the customization menu and adding it to a section of your site where it will be displayed. A photo book allows your viewers to see your pictures and can be configured to display random photos on your homepage.

Revenue
Popular blogs can reach a broad audience that a blogger can utilize to make a profit by adding revenue ads to the site. Blogger has Google AdSense directly available to users which will display content on the blog. The owner receives revenue when a user clicks on an ad. AdSense also allows the owner to track the site's audience, including the location, time on site and number of one-time viewers, which they can use to customize the site to a specific audience.

Search Engine Optimization
Search engine optimization or SEO customizes your Blogger site to be found in search results from a specific keyword. An owner can improve the likelihood of an Internet searcher finding their site by editing the Meta tags within the Blogger template to include keywords that are directly related to the site's content. It is recommended that you use the keywords frequently in the content of the site. Providing links to other blogs and websites as well has having other sites display your link will improve your site within the major search engines.

Read More...

Ideas for Blog Labels

1 comment

Ideas for Blog Labels
Blog labels are used by Google's Blogger platform. Labels are similar to blog tags in that they help to keep posts organized and assist users in finding content that may be of interest to them. The way in which you use labels is entirely up to you, but there are a few good concepts to employ when you first start to help strengthen your blog.

Short is Sweet
Blog labels are not intended to be used as summaries, so keeping them short is a good way to keep your blog looking its best. Try to keep your labels down to one word, and make each of those words as succinct as possible. For instance, a post about a barbecue could have the labels "Food," "BBQ," and "Grill." The easier the labels are to understand, the more likely a reader will click them.

Repeat Labels
Blog labels are their strongest when you have several posts that share the same labels. One mistake many beginning bloggers make is creating too many labels for each post, making it hard to categorize their blog as the posts and label count grows. Try do decide on some core labels for the sake of organization, which you can repeat throughout the blog. You can pepper these with more specific labels as well, but keeping a core group makes your blog easier to navigate.

Go Crazy
If you're trying to break your blog out of the mold, you may wish to forgo the traditional label setup and use your labels to enhance each post. One use of labels that is increasing in popularity is hitting each post with a collection of super-specific, but funny labels. The popular technology/geek culture blog Geekologie, for instance, often labels each of its posts with funny labels like "Yay!" or "VROOM VROOM!" Funny labels are just another method of engaging your readers.

Label Cloud
A label, or tag, cloud is a display somewhere on the front page of your blog that showcases your most popular tags. This is a great method for displaying a bunch of categories to your readers right when they hit your page, which allows them to choose posts that apply to them. This is also a good way to bring readers to older posts, as you may not necessarily blog about the same things with the same labels each day.
Read More...

Thursday, 11 April 2013

How to Make Your Blogger Blog More Visible in Google

Leave a Comment
How to Make Your Blogger Blog More Visible in Google
If your goal as a blogger is to reach a wide audience, you'll need Google as a partner. When you create a blog, you make it more visible in Google search results by creating engaging content, specifying keywords and ensuring your blog settings allow Google to register your blog for more plentiful hits.
  1. Set your blog to "Public." If you have a private blog, Google's website analysis tools aren't able to crawl the site for information and content. Change your settings by signing in, then selecting "Settings" and "Permissions." Set the "Who Can See My Blog?" option to "Anyone."

  2. Allow your blog to be searchable by Google. Google will not add your blog to its directories or display your blog in search results unless you sign in to Blogger, visit "Settings and "Basic," then select "Yes" for both the "Add your blog to our listings?" and the "Let search engines find your blog?" options.

  3. Create engaging content. Google's bots search pertinent content on a daily basis and can differentiate between high and low quality content. Pages that have quality content, informative posts and substantial length are usually ranked higher than lower quality work.

  4. Add pictures to your blog. This make your blog more engaging and interesting, and it also garners visibility through Google Images, not just Google. Only use images for which you hold the copyright, or for which you have permission to share.

  5. Submit your blog to Google for analysis and posting. If your blog is new, it may take several weeks before it's recognized by Google. By submitting your blog manually, the process is speeds up, but still may take as long as 30 days.

Read More...

Meta Description Character Limits

Leave a Comment

Meta Description Character Limits
The Meta description is a series of Meta tags that contain information about a Web page and is placed in the "header" section of the Web page code. Here, they are invisible to the page visitor but are visible to search engines. The Meta tag is optional but will help your page rank for keywords found in the text of the description. It will also help a searcher understand what your page is about. But sometimes your description text will not show up in the search results entry for your page.

How the Meta Description Tag Works
Search engine results list the page title in bold type, followed by two lines of text that tell something about the page. In theory, these two lines of text should be the text contained in your Meta Description tag for the page. Therefore, since this section of the search results entry has a maximum length (which is slightly different for each search engine), you should set a maximum length for the text in your Meta Description tag so all the text you enter shows up on the search engine results.

Why Your Meta Description Might Not Match the Search Engine Description
In the real world of Web search, the text from a page's Meta Description tag is not always the text that shows up on the search results page. If the searcher searches for a keyword phrase that is not part of the description, the text will often be part or all of the sentence from the page containing the keyword phrase, rather than the Meta Description. So if you have a page about hot air balloons that happens to also contain your full name, and if someone searches for your name as a search term, the results will show the sentence from the page containing your name instead of the description.

Limit for Various Search Engines
Different search engines have a different maximum length for the various parts of their search result entries. SEO experts recommend you pick the smallest limit and use that, so that no matter which search engine someone uses, they will see the entire description if the search engine includes it. The character limit for Google is 156, for Yahoo it is 161, for Bing it is 150 and for Ask.com it is 312 characters, though they seem to display text from the page rather than the description. Therefore, your best bet is to write a Meta Description tag with text that is no longer than 150 characters.

Considerations
When planning what to write in the Meta Description, don't just consider character count. Think of this text like a mini ad for your page. It should tell what's on the page but in a compelling way so the person reading it is interested and wants to click on your link rather than the next one.
Read More...

Wednesday, 10 April 2013

How to Get Your Blog in the Next Blog Button on Blogger

Leave a Comment
How to Get Your Blog in the Next Blog Button on Blogger
Every Blogger blog has a navigation bar at the top that includes a "Next Blog" link. When a visitor clicks this button, Blogger loads another Blogger blog similar to the current blog. Blogger considers a blog's language and content when determining similar blogs. You can make sure your own Blogger blog comes up when people click the "Next Blog" link on other, similar blogs by modifying a setting in your Blogger control panel.

  1. Sign in to your Blogger.com account.

  2. Click "Settings" next to the name of your blog.

  3. Select "Yes" next to "Add your blog to our listings?" to make your blog eligible to appear in the "Next Blog" link.

  4. Click "Yes" next to "Let search engines find your blog?". It will include your blog in Google Blog Search and ping Weblogs.com.

  5. Click "Save Changes."

Read More...

Tuesday, 9 April 2013

How to Make a Table of Contents Page For Blogger

2 comments
How to Make a Table of Contents Page For Blogger
The table of contents is found near the front of a book, journal, long brochure or other publication. It lists the sections in which the publication is divided, such as the chapters, articles, "parts" or major divisions or poems. Each listed section, in most cases, is paired with the page number on which it starts, or, in online versions of publications, with a hyperlink to that section. A table of contents assists the reader--and sometimes the author or editor--in finding specific sections. It also clarifies the material's overall organization.

Here in this tutorial, you will see how to add a Table of Content widget in Blogger. Remember to follow the procedure step by step carefully so that you will not face any problem and backup your template before proceed.
  1. Login to your Blogger Dashboard and go to "Pages".

  2. Click on "Create a New Page" > "Blank Page" > "HTML".

  3. Copy and paste the following code:

  4. <script style="text/javascript" src="https://bloggerxtutorials.googlecode.com/files/blogtoc-min.js"></script>
    <script src="http://bloggerxtutorials.blogspot.com/feeds/posts/default?max-results=9999&amp;alt=json-in-script&amp;callback=loadtoc"></script>

  5. Replace "http://bloggerxtutorials.blogspot.com" with the address of your blog.

  6. Click "Publish". It’s as simple as that!

Read More...

Monday, 8 April 2013

Five Common Examples of Meta Tag Use

Leave a Comment

Five Common Examples of Meta Tag Use
A meta tag is a string of HTML code that contains information specific to a Web page. Meta tags are not visible to visitors, unless the visitor views the page source code; however, meta tags can help impact how Web search engines index and display a Web page in search results. There are several types of meta tags, with the two most common being the meta description tag and meta keywords tag.

Meta Description Tag
The meta description tag is the most common use for a meta tag. Meta description tags include a short synopsis or description of the Web page and help a search engine understand what a Web page is about. Meta descriptions are especially important on pages that do not contain content such as text or headers that describe the Web page. Search engines often use information found on the meta description tag in search results, but not always.

Meta Keywords Tag
The meta keywords tag is the second most common use for a meta tag. The meta keywords tag includes keywords related to the Web page and serve to help search engines determine which keywords to index a website for. Although many search engines today place little emphasis on meta keywords, using the meta keywords tag on your Web page can further optimize the page and benefit search engine rankings.

Meta Content Language Tag
The meta content language tag specifies the natural language of the Web page, further categorizing it for search engines. The U.S. English-based websites have no need for this tag, but non-U.S. English websites can benefit from including the meta content language tag in the website source code.

Meta Content Type Tag
The meta content type tag declares the character set used on the Web page, such as ASCII, ISO or Unicode. Implementing the meta content type tag and specifying the character set used when designing the Web page can help reduce display problems that occur when browsers render your website.

Meta Author Tag
Although the meta content language tag has no impact on search engines or the overall performance of the website, you can include this tag on a Web page to give tribute to content creators of the page. If several individuals contributed content to the site, it is recommended that the meta author tag include all individuals' first and last names.
Read More...

How to Add Meta Tags to a Website/Blog

Leave a Comment
How to Add Meta Tags to a Website/Blog
Meta Tags are used to apply effects, define keywords, and select page language, as well as many other uses in HTML. These bits of code help a developer control how a webpage operates and can often control part of the visitor’s experience. Meta Tags are typically simple lines of code that can be used by even programmers new to HTML. This article will offer some simple Meta Tag examples that will help you tune up your website for future visitors.
  1. Add a Keyword meta tag to assist search engines in analyzing your page and producing more hits. Use the following code:

  2. <meta name="keywords" content="keyword1, keyword2, keyword3" />

    Place words that describe your website in the 'content' section where I've used the words 'keyword'. Add as many keywords as you like, separating each with a comma. Don't go overboard and list hundreds of keywords. A few well thought out words will work fine.

  3. Include the following tag to provide a description of your webpage.

  4. <meta name="description" content="a description of your website/blog goes here." />

    Write a short, concise description of your webpage in the space shown above. Again, a few good sentences is all that is needed.

  5. Define the default style sheet language when using Cascading Style Sheets with your page by adding the following code:

  6. <meta http-equiv="Content-Type" content="text/html;charset=ISO-8859-1" />

    charset=iso-8859-1 is the most typical character set name in use.
Final Code for Meta Tags

<meta http-equiv="Content-Type" content="text/html;charset=ISO-8859-1" />
<meta name="keywords" content="keyword1, keyword2, keyword3"" />
<meta name="description" content="a description of your website/blog goes here." />

Place the meta tags you want to insert between the opening <head> and closing </head> of your website/blog.
Simple typos can prevent html code from working correctly. If you have problems, check your spelling first.
Read More...

Sunday, 7 April 2013

How to Do SEO for Blogspot

Leave a Comment
How to Do SEO for Blogspot
All website owners, online writers, and bloggers should understand what search engine optimization is and how to use it. If you write on a Blogger site, you may earn revenue from advertisements posted on your blog. In order to increase the number of clicks your blog receives, you must first learn how to increase your ranking when someone conducts a search related to your topics. This requires a knowledge of search engine optimization -- or SEO.
  1. Give your blog a name that is relevant to the topic you write about and includes keywords. The name of your blog will show up in the URL, and the search engines will pick up the keywords.

  2. Create an informative and useful title tag, making sure that the first 63 letters comprise keywords that are highly relevant to the content in your blog and that searchers are likely to query. Use a title tag that is descriptive of the blog topic and content, to ensure it ranks high on search engines -- increasing the odds that people will click on your link, as opposed to lower-ranking ones, when conducting a search.

  3. Fill your blog with keywords, but place a cap on using repetitive keywords, as the search engines will consider your blog spam. Keywords should mirror what people would enter when researching a topic pertinent to your blog.

  4. Link back to previous entries in the one you are currently writing, through the use of keywords. Create a back link by using the following code:

  5. <a href= “http://websiteofyourblog.com”>YourKeyword</a>
    

  6. Add headings to separate different sections of your blog, and use heading tags to help search engines pick up on them. Create a heading tag using the following code:

  7. <H1> YourHeading 1</H1>

    Use the heading tags H1, H2 and H3 as needed and in order of relevance to your blog, and make sure there are keywords in each heading.

  8. Have other pages link to your blog, such as a friend that writes a complimentary blog or any articles you may write for another website.
Carefully pick your keywords according to what you feel is most relevant to your blog and what people will likely type in when researching your blog's topic. Always keep these words in mind when writing your blog.
Don't put too many keywords in one particular blog. Use them in each blog a few times.
Read More...