Wednesday 19 June 2013

How to Hide Blogger Nav Bar and Have It Appear When You Hover Over It

Leave a Comment
How to Hide Blogger Nav Bar and Have It Appear When You Hover Over It
A navigation bar isn't defined in any one way; on many websites, such as Google and Facebook, feature a navigation bar along the top of the page. However, you can also feature a invisible navigation bar and have it reappear when you mouse over the top of your blog.

Thanks to AllBlogTools.com for sharing this trick.
  1. Login to your Blogger account.

  2. Go to "Blogger Dashboard" > "Template" > "Edit HTML".

  3. Back up your template.

  4. Check the  "Expand Widget Templates".

  5. In the code window, search for (Ctrl + F):

  6. ]]></b:skin>

  7. Add below code just before ]]></b:skin> tag

  8. #navbar-iframe {
      height:5px;
      }
    
    /* IE7, IE8, IE6 */
      #navbar-iframe { height/***/: 30px9; }
    
    #navbar-iframe:hover {
      height:40px; !important; 
      }
  9. Save your template and you are done.

If you already applied "How To Remove A Blogger Navbar" to your blog, please undo it before you start.

This hack is compatible with all browsers but some times it’s not working correctly with some IE versions.
Read More...

Tuesday 18 June 2013

How to Add Post Dividers to Blogger

Leave a Comment
How to Add Post Dividers to Blogger
Without a divider between your Blogger posts, you may find that your words are becoming a bit jumbled together. Adding a simple divider image to your Blogger template can give your blog a much more polished look. Once you have chosen or designed a divider, you will need to edit the code within your template. Though this edit can be accomplished with a bit of copy-and-paste, this tutorial is recommended for those with basic knowledge of HTML.
  1. Upload your divider image to your preferred image hosting location. If you do not have your own Web host, there are a number of free online image hosting services.

  2. Open the "Template" menu within your Blogger dashboard. Select "Edit HTML."

  3. Click the "Download Full Template" link at the top of the Edit HTML page. This will backup your current template as-is. This way, if you make a mistake in editing the code or decide that you'd rather go back to the original settings, you can upload your backup later.

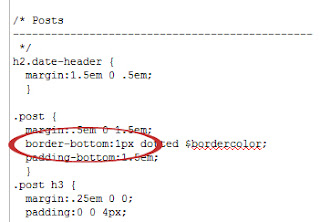
  4. Locate the "Posts" section within your template's code. Find the following section of code:

  5. .post {
    margin:.5em 0 1.5em;
    border-bottom:1px dotted $bordercolor;
    padding-bottom:1.5em;
    }

  6. Replace the code from step four with the following code. The "URL" value will need to be changed to the full Web address for your divider image. The margin and padding values can be customized as well.

  7. .post {
    background: URL(REPLACE THIS TEXT);
    background-repeat: no-repeat;
    background-position: bottom center;
    margin:.5em 0 1.5em;
    border-bottom:0px dotted $bordercolor;
    padding-bottom:5.5em;
    }
The margins and padding values may vary slightly depending on the template you are using.

Read More...

Monday 17 June 2013

Add Sharing is Sexy Bookmark to Blogger

Leave a Comment
Add Sharing is Sexy Bookmark to Blogger
Social bookmarking is a great tool to drive tons of traffic to a blog/website within minutes. “Sharing is sexy” blog gadget/widget is one of the most popular social bookmarking widget in blogsphere. The button of this widget has autohide effect when you hover on it.
  1. Log in to your "Blogger Dashboard "> "Template" > "Edit HTML".

  2. Click on "Expand Widget Templates" check box.

  3. Find (Ctrl + F) below code in your template:

  4. ]]></b:skin>

  5. Copy and paste the code below before it.

  6. .sexy-bookmarks {
     height: 54px;
     background:url('http://4.bp.blogspot.com/-Cpq2EvNo7cQ/TvtIdwHLAjI/AAAAAAAAA7o/GgtjfWGsMc8/s1600/11sharingsexy.png') no-repeat left bottom;
     position: relative;
     width: 540px; }
    .sexy-bookmarks span.sexy-rightside {
     width: 17px;
     height: 54px;
     background:url('http://4.bp.blogspot.com/-Cpq2EvNo7cQ/TvtIdwHLAjI/AAAAAAAAA7o/GgtjfWGsMc8/s1600/11sharingsexy.png') no-repeat right bottom;
     position: absolute;
     right: -17px; }
    .sexy-bookmarks ul.socials {
     margin: 0 !important;
     padding: 0 !important;
     position: absolute;
     bottom: 0;
     left: 10px; }
    .sexy-bookmarks ul.socials li {
     display: inline-block !important;
     float: left !important;
     list-style-type: none !important;
     margin: 0 !important;
     height: 29px !important;
     width: 48px !important;
     cursor: pointer !important;
     padding: 0 !important; }
    .sexy-bookmarks ul.socials a {
     display: block !important;
     width: 48px !important;
     height: 29px !important;
     font-size: 0 !important;
     color: transparent !important; }
    .sexy-furl, .sexy-furl:hover, .sexy-digg, .sexy-digg:hover, .sexy-reddit, .sexy-reddit:hover, .sexy-stumble, .sexy-stumble:hover, .sexy-delicious, .sexy-delicious:hover, .sexy-yahoo, .sexy-yahoo:hover, .sexy-blinklist, .sexy-blinklist:hover, .sexy-technorati, .sexy-technorati:hover, .sexy-facebook, .sexy-facebook:hover, .sexy-twitter, .sexy-twitter:hover, .sexy-myspace, .sexy-myspace:hover, .sexy-mixx, .sexy-mixx:hover, .sexy-script-style, .sexy-script-style:hover, .sexy-designfloat, .sexy-designfloat:hover, .sexy-syndicate, .sexy-syndicate:hover, .sexy-email, .sexy-email:hover {
     background:url('http://2.bp.blogspot.com/-CbLImS-FYzE/TvtIimuGxcI/AAAAAAAAA7w/qC_c-F8jtYI/s1600/11Sexysprite.png') no-repeat !important; }
    .sexy-furl {
     background-position: -300px top !important; }
    .sexy-furl:hover {
     background-position: -300px bottom !important; }
    .sexy-digg {
     background-position: -500px top !important; }
    .sexy-digg:hover {
     background-position: -500px bottom !important; }
    .sexy-reddit {
     background-position: -100px top !important; }
    .sexy-reddit:hover {
     background-position: -100px bottom !important; }
    .sexy-stumble {
     background-position: -50px top !important; }
    .sexy-stumble:hover {
     background-position: -50px bottom !important; }
    .sexy-delicious {
     background-position: left top !important; }
    .sexy-delicious:hover {
     background-position: left bottom !important; }
    .sexy-yahoo {
     background-position: -650px top !important; }
    .sexy-yahoo:hover {
     background-position: -650px bottom !important; }
    .sexy-blinklist {
     background-position: -600px top !important; }
    .sexy-blinklist:hover {
     background-position: -600px bottom !important; }
    .sexy-technorati {
     background-position: -700px top !important; }
    .sexy-technorati:hover {
     background-position: -700px bottom !important; }
    .sexy-myspace {
     background-position: -200px top !important; }
    .sexy-myspace:hover {
     background-position: -200px bottom !important; }
    .sexy-twitter {
     background-position: -350px top !important; }
    .sexy-twitter:hover {
     background-position: -350px bottom !important; }
    .sexy-facebook {
     background-position: -450px top !important; }
    .sexy-facebook:hover {
     background-position: -450px bottom !important; }
    .sexy-mixx {
     background-position: -250px top !important; }
    .sexy-mixx:hover {
     background-position: -250px bottom !important; }
    .sexy-script-style {
     background-position: -400px top !important; }
    .sexy-script-style:hover {
     background-position: -400px bottom !important; }
    .sexy-designfloat {
     background-position: -550px top !important; }
    .sexy-designfloat:hover {
     background-position: -550px bottom !important; }
    .sexy-syndicate {
     background-position: -150px top !important; }
    .sexy-syndicate:hover {
     background-position: -150px bottom !important; }
    .sexy-email {
     background-position: -753px top !important; }
    .sexy-email:hover {
     background-position: -753px bottom !important; }

  7. Now find (Ctrl + F) this code in the template:

  8. <data:post.body/>

  9. Copy the following code and paste it just below it:

  10. <div class='sexy-bookmarks'>
    <ul class='socials'>
    <li class='sexy-delicious'><a expr:href='&quot;http://del.icio.us/post?url=&quot; + data:post.url + &quot;&amp;title=&quot; + data:post.title' target='_blank'/></li>
    
    <li class='sexy-digg'><a expr:href='&quot; http://digg.com/submit?url=&quot; + data:post.url + &quot;&amp;title=&quot; + data:post.title' target='_blank'/></li>
    
    <li class='sexy-technorati'><a expr:href='&quot; http://technorati.com/faves?add=&quot; + data:post.url + &quot;&amp;title=&quot; + data:post.title' target='_blank'/></li>
    
    <li class='sexy-reddit'><a expr:href='&quot; http://www.reddit.com/submit?url=&quot; + data:post.url + &quot;&amp;title=&quot; + data:post.title' target='_blank'/></li>
    
    <li class='sexy-stumble'><a expr:href='&quot; http://www.stumbleupon.com/submit?url=&quot; + data:post.url + &quot;&amp;title=&quot; + data:post.title' target='_blank'/></li>
    
    <li class='sexy-designfloat'><a expr:href='&quot;http://www.designfloat.com/submit.php?url=&quot; + data:post.url + &quot;&amp;title=&quot; + data:post.title' target='_blank'/></li>
    
    <li class='sexy-facebook'><a expr:href='&quot; http://www.facebook.com/sharer.php?u=&quot; + data:post.url + &quot;&amp;title=&quot; + data:post.title' target='_blank'/></li>
    
    <li class='sexy-twitter'><a expr:href='&quot; http://twitthis.com/twit?url=&quot; + data:post.url + &quot;&amp;title=&quot; + data:post.title' target='_blank'/></li>
    
    <li class='sexy-furl'><a expr:href='&quot; http://www.furl.net/storeIt.jsp?u=&quot; + data:post.url + &quot;&amp;title=&quot; + data:post.title' target='_blank'/></li>
    
    <li class='sexy-syndicate'><a href='YOUR FEED BURNER URL' title='Subscribe to RSS'/></li>
    
    <li class='sexy-email'><a expr:href='&quot; mailto:?subject=&quot; + data:post.url + &quot;&amp;title=&quot; + data:post.title' target='_blank'/></li>
    </ul>
    <span class='sexy-rightside'/>
    </div>

  11. Save your template.
Remember to replace "YOUR FEEDBURNER URL" with your real feedburner url.
Read More...

Sunday 16 June 2013

How to Show or Hide a Blogger Blog on Your Profile

Leave a Comment
How to Show or Hide a Blogger Blog on Your Profile
It's common for people who use Blogger to have more than one blog at Blogger. It's also common for one person to manage or monitor several blogs. A great way to get traffic from one blog to other blogs within Blogger is to list on a profile one or more other blogs. The administrator can determine which blogs will show on a profile. To show or hide a Blogger blog on your profile, follow the steps.
  1. First you need to log in to Blogger.

  2. On the "Blogger Dashboard" click on the "Edit Profile" link.

  3. On the new page, scroll down to "Show My Blogs."

  4. Here you will see a list of all of your blogs.

  5. If you want a blog to show on your profile click in the box next to the title of the blog.

  6. Once you do, there should be a check mark in the box.

  7. If you want to hide a blog from your profile, leave the box next to that blog empty.

  8. When you've selected the blogs you want to show, click "Save Settings".
You can change what Blogger blogs show on your profile any time you want.
Adding Blogger blogs to your profile is the same as recommending them. You can also add other people's blogs to your list. You and your friends could exchange links: you add a link to their blog and they add a link to your blog on their profile.
If you don't click on "Save Settings," your profile will remain the same as it was before.

Read More...

Saturday 15 June 2013

How to Earn More Page Views With Blogger Blogs

1 comment
How to Earn More Page Views With Blogger Blogs
Finding ways to gaining exposure on your blogger blog is part of the fun of blogging. There are things you can do to help you get more visitors and even subscribers. Once you have a big following, you can even earn money by blogging.
  1. Update your blog regularly. If you want people to come, give them interesting content to read. This content will help you get indexed in search engines on relevant topics and bring visitors your way.

  2. Publicize your blog by telling people about it. Add your blog URL to your email autosignature line and to signature lines in message forums. This can entice visitors.

  3. Comment on other people's blogs with a link back to your own. People will often return the favor and if they find something interesting on your blog, they may bookmark you and visit again.

  4. Syndicate your blog by joining an RSS (Really Simple Syndication) feeder service such as the one at Feedburner which can help you bring more traffic in by syndicating your blog to many news sources and give people an option to subscribe to receive future entries in their email inbox.

  5. Install a fun and interesting template. Templates that are unique on blogger blogs can grab someone's attention and get them to view more than just your landing page. There are many free templates online that you can download to make your blogger blog unique.

  6. Ping your blog. A ping service such as Pingomatic is a Web site that you simply put your blog information into each time there's a new blog entry written. It notifies multiple directory services that you have something new to share.

  7. Join Technorati and utilize tools there including tagging services that help you categorize your blog to bring it more exposure and to advertise your blog in directories. Technorati has a lot of useful tools for bloggers.

  8. Submit your blogger blog to the search engines for indexing. For Google, use the link in the Resources section. This will help your blogger blog gain more page views when people search on a subject that Google has indexed. This is especially helpful if you write about a niche topic.

  9. Join social bookmarking Web sites and list their widgets on your blog. Bloggers can bookmark their own posts on sites like Digg and Del.icio.us in order to gain more page views. Other people who bookmark your site might bookmark you with widgets and additions to your blog template which can bring new visitors in as well.
Read More...